Maxanet Online Auction Software
Auction Software Support
Maxanet is dedicated to providing the best support possible for our clients using Maxanet Online Auction Software. Please review the following instructional documents and the video series below for help with common questions. If you have any additional questions please make sure to Contact Us.

Support Documentation
Getting Started
Important Information
Introduction
Click here to watch the Maxanet Video Tutorial for the Getting Started Guide.
We highly recommend using the Mozilla Firefox web browser when using your administrative pages. Visit the Firefox homepage and download.
Logging In
First, upon logging in to your admin panel for the first time, make sure to update your contact information (Main Menu>Contact Information).
This contact info will be listed on your event/auction Details page and also when using the Maxanet bulk mailer utility this information will be inserted. We also use it for our billing purposes. It’s very important to put your email address and the correct website address (Maxanet hosted URL) into the Contact Information page.
Select Your Workspace
Select your workspace by using the drop down menu located at the top center of the admin page. A workspace is an event/auction and in your account they are listed in numberic order (e.g. example1, example2, example3) with your account name in front of the number.
An event/auction is loaded into a workspace, runs its course, ends, is invoiced, archived, and then the workspace is ready to be re-used for your next event. It’s very important that you select the correct workspace first before making any changes.
Main Menu: Auction Details
Add your event/auction Title, Date, Display Format, Start/End Time (military format in Eastern Time Only), Auto-Extend, Staggered ending, and other details here. Please read the paragraph descriptions to the right of the page explaining each option.
Any updates to this page must be saved by clicking on the “Update Auction Details” button at the bottom center of the page.
Main Menu: Auction Messages
These boxes accept HTML for advanced formatting and will appear on your events Details page and your Calendar page (depending on your auction calendar format (0-13 in the Main Menu: Page Settings).
Here’s an HTML cheat sheet. You can use the ‘preview’ link to view the changes.
If you’d like to learn a little more, try out this free HTML tutorial site.
Inventory and Photos
There are 5 options available for adding inventory and photos to an event.
- Use the Maxanet Integrated Inventory & Photo
- Loader to load inventory and photos (easy and recommended for new users)
- Use Excel (or any database/spreadsheet) to create your inventory and MaxaNet to load images.
- Use Excel to create your inventory and an FTP program to load the images to the web.
- Use Excel to create elaborate inventory descriptions and an FTP program to load the images to the web.
- Have your sellers or contractors use an online interface to add inventory and images.
Please view the Help Docs labeled “Inventory Template Downloads” in the next section below for more information including MS Excel inventory template files which you can download and use for your sales. You can also watch a Video Tutorial Series for loading inventory & photos.
Make your Auction Live and/or Open for Bidding
The Auction Details, Auction Messages, and Inventory & Photos are loaded and ready to go…now your event/auction can go live by adding the workspace # to the Main Menu: Calendar & Archives page. The opening paragraph of text on this page provides instructions and describes the required format.
If you’ve loaded your inventory descriptions, but the ‘view items and bid’ link to enter the auction is not appearing on your public facing auction details page, you must ‘update the categories’. Go to the Integrated Inventory & Photo Loader and scroll to the bottom of the page and click on the ‘update categories’ button. This will create the ‘view items and bid’ link your bidders will use to enter the auction.
While the Event/Auction is live – make sure the military time format in the Main Menu: Auction Details is properly formatted. All entries are in EST format. Events cannot pass the 12:00am EST time mark. All items must end before 12:00am EST, or start to close at 12:01am EST. For example, if your auction has 450 lots and is 3 items per minute, you cannot start to end your sale at 10:00pm EST as the duration of the auction will be 2.5hrs and overlap 12:00am.
Closing the Auction
Main Menu> Online Bidding Tools> Enhanced Invoicing
Wait until bidding has closed on all items. Make sure no items have been auto-extended. Click on the “Save current prices as auction results” button in the center of the page. Prices have now been saved.
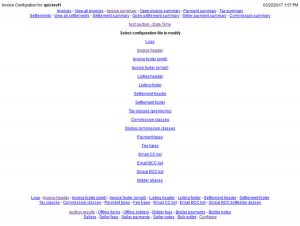
The default view is the Invoice Summary screen (top navigation menu with blue colored links). From the bottom footer menu, click on “Bulk Editor” to apply your tax & premium classes. Click on “Configure” to create new tax/premium classes, add a logo to the invoice, add HTML formatted text/links to the body of the invoice, and much more.
See the “Enhanced Invoicing” help docs tab above for more information.
Archive the Auction
Next Auction
Before you begin your next auction, see… ‘online bidding tools’ – ‘delete all bids’.
Connect via FTP to permanently delete your photos from the workspace
– or –
download/transfer the pictures to an archives folder you create or on a separate hosting account.
Questions?
Please call us at 814-558-2306 or send us an email on our Contact Page.
Inventory / Descriptions
Integrated Inventory & Photo Loader
Step #1
Download and Install the Mozilla Firefox web browser. Download Link.
You’ll want to use the Mozilla Firefox web browser instead of Internet Explorer, Chrome, or Safari. There are many reasons why but the most important is that Firefox will give you the ability to drag & drop photos using a desktop setting (see below for mobile options) and also that Maxanet requires Pop-Up windows enabled to load pictures, which Firefox allows you to do much easier than other web browsers.
Step #2
Open your Maxanet administrative link using the Firefox web browser and login to your account. Select your workspace from the top drop down menu.
Navigate to the Main Menu: Inventory and Photos: Integrated Inventory and Photo Loader
Step #3
Add a new inventory description by clicking on the “New” button at the top. Give the first Lot # and item # of 1 and then add the inventory description. The Category, Minimum Starting Bid, Reserve Price, Quantity, Seller, BuyNow Price are all optional fields. Click on the “Add item” button to save the description and then you’ll be ready to load photos.
Items MUST be added in sequential order…1, 2, 3, 4, etc. You cannot go back later and add in item #3 if you forgot to add it originally. To solve this issue you would need to download your inventory and save as a text file, open it in Excel as a text-tab delimited file, add item #3, and then save as a tab delimited file and use Option#1 in the Inventory and Photos page to upload this inventory file.
Step #4
There are 2 options for loading inventory photos using the Integrated Inventory and Photo Loader.
Option #1. Use the “Browse…” buttons to navigate your computer files to find the correct photo and then hit the “Upload Image(s)” link. You can add 5 items at a time and then Upload them at once.
Option #2. (recommended). Using firefox you have a “split screen” setup where your Firefox web browser takes up the left side of your screen and then the folder with your inventory photos takes up the right side of screen. You can then click and hold your mouse button on the picture and drag and drop that photo into the field that says 1.JPG. You then hit the “Upload Image(s)” button. This saves a lot of time and is very easy to do.
Step #5
After you’ve added all of your item descriptions and loaded your pictures you must click on the “Update Categories” button at the bottom of the Integrated Inventory and Photo Loader page. Doing this will automatically create a “View Items and Bid” link on your auction messages/details page and allow your website visitors to enter the sale and start bidding.
MS Excel Inventory Upload Options
Maxanet has the ability to mass upload an inventory file with your item descriptions. The inventory file will be uploaded in the Main Menu: Inventory & Photos: Option #1, Option #2, or Option #3 sections. There are descriptions above each option type explaining the required column headers for each of the 3 formats.
After completing your inventory file in Excel, you MUST save the MS Excel file as a “text (tab delimited)” file type prior to upload using Option #1/2/3 in the Inventory and Photos page. For Mac users, save the file as “windows formatted text file” type. Once uploaded, you can now use the Integrated Inventory & Photo loader to load your photos, or use FTP for mass uploading of photos.
If you do not have Excel, you can use just about any speadsheet or database program to create the layout below. Place the inventory information into the following columns. Do not use column headings.
The following example inventory file is for upload Option #1 in the Inventory & Photos page and it matches the format used by the Integrated Inventory & Photo Loader utility.
A = item number (required)
B = category (optional)
C = description (required)
D = additional description (optional and often left blank)
E = photo name(s) (optional)
F = taxable (optional)
G = minimum starting bid (optional)
H = thumbnail image name(s) (optional)
i = reserve price (optional)
J = quantity (optional)
K = seller ID (optional, defaults to “1”)
L = buynow price (optional)

Save the speadsheet to a local folder on your computer. When you are ready to upload the inventory to your MaxaNet workspace you will need to save the file in a tab-delimited text format and give it a filename of data.txt for example. To save the spreadsheet in a tab-delimited text format, select the File and Save As… options. Set the Save as Type option to ‘Text (tab-delimited)’. The pipe delimiter looks like this | and is located underneath most keyboards backspace key (hold shift and press the \ key). If using a MAC version of Excel, you need to save as Windows format.
 When saving Excel files as text files, Excel will display a message. See below. Select ‘OK’.
When working with text files in Excel, a message may appear when exiting. See below. Select ‘No’.
 For larger events where you’d like to mass upload photos all at once, please download Option #2 from the above MS Excel template files as a guide. You’ll notice in columns C & D that there are picture names already filled in…these are the image links and they tell the Maxanet system which pictures to display for which items. The file names the photos are saved as and uploaded as must match the corresponding inventory file column C & D cells. Each item requires 2 pictures – a main picture and a thumbnail picture. These pictures are the same, just different sizes. In the example template file, item #1 has 01.jpg as the main photo, and 01t.jpg as the thumbnail photo. 01a.jpg and 01at.jpg are the 2nd picture for item #1, and 01b.jpg and 01bt.jpg are the 3rd picture for item #1.
To upload your photos you first need to resize & rename the photos. There are 2 utilities available that will handle this process in an automated fashion saving you lots of time.
Irfanview – website/download link. Free product.
Adobe Photoshop – website/download link. Free trial, monthly paid subscription.
Every camera manufacturer provides a way to reduce the size of the picture taken. Please reference your user camera user manual or look for the settings pertaining to the picture size
No larger than 800 x 600 pixels – the smaller the photo the faster they load
A resolution of 72 dpi or lower – a lower dpi (dots per inch) equals a smaller faster loading file
A filename that matches what is (or will be) recorded in the spreadsheet in the corresponding column(s)
Make sure to be consistent with the case (upper vs. lower) of the filenames and extensions (.JPG vs .jpg)
No spaces or punctuation characters in the filenames
We really like the image editing software Irfanview. It is free, easy-to-use, and full of great image editing and renaming features. One feature in particular is a huge time-saver. Irfanview can take an entire folder of images (or even from the camera directly) and copies them to another folder (C:\maxanet\example for this example), resizing the files in the process.
Here is a quick overview of using Irfanview to convert your images… Once Irfanview is open, select File and Open and browse to find an image file for the event. Once selected it will be displayed in the viewer. To batch resize all of the files in selected folder select File and Batch conversion/rename. The Batch conversion screen will appear. Select one of the files to convert and then the Add all option on the left side of the screen. The filenames will all appear in the Input files box. On the right side of the screen select Browse to find and define the output folder (C:\maxanet\example in this example). In the lower right corner of the conversion screen select Advanced options to define the conversion details.
Irfanview – Batch conversion screen
 The Advanced options screen will appear. Make sure that all of the settings are set as below. When finished, select OK and then the Start option in the upper left corner of the previous Batch conversion screen. The files will be resized and copied to the C:\maxanet\example folder. The whole process will take less than a few minutes…. an HUGE time saver over manipulating the files individually.
Irfanview – Advanced batch conversion details screen
Inventory Template Downloads
You can use the Maxanet Integrated Inventory & Photo loader to create your item descriptinos 1 by 1…or you can use MS Excel to create your inventory descriptions and upload. We have 3 inventory template files with different options below that you can download and use for your auctions:
- Option #1 Sample Inventory File
MS Excel Format (simple, best for using with the Integrated Inventory & photo loader) - Option #2 Sample Inventory File
MS Excel Format (advanced, best for use with FTP for picture loading) - Option #3 Sample Inventory File
MS Excel Format (advanced concatenating descriptions, FTP picture loading)
Categories
Thumbnail Picture Sizes
Hiding a Bid Box
Adding or embedding a Video or PDF
You can add a video, a PDF file, or a link to a webpage into any item description.
To embed a video, it’s best to upload the video to YouTube and then you can embed the video into your item description. When viewing the video on YouTube, beneath the video on the right side click on the ‘Share’ link. In the pop-up window click on the ‘EMBED’ link in the lower right corner. This will then display the HTML code of the video. Copy all of the code which will look like this:
Copy and paste this code into your item description using the Maxanet Integrated Inventory and Photo uploader, or using the Edit Inventory button from the Inventory and Photos page within Maxanet.
NOTE: If you need your embedded video to be responsive, so it automatically adjusts the size/width of the video to fit your page, please contact and we’d be glad to add the appropriate CSS code to make your video responsive.
To add a clickable link to a video or PDF, without embedding it into the description, so when someone clicks the link, it opens in a new web browser window. To do this, you must first upload the video to YouTube or the PDF to a site like PDF-Archive.com. You can also upload the video to your Maxanet server if you have an FTP program. Once uploaded, you’ll need the URL link to the video. In youtube, click the ‘Share’ button below the video to get the URL. With the URL you can now use the following code:
In the example code above, replace the “https://youtu.be/6EF4zRMfrlk” with your own URL. Copy and paste this code into your item description and it will now link to the video or PDF document and when clicked will open in a new window.
Photo Upload Options
Optimizing Images Prior to Upload
Adjust your digital camera settings prior to taking your photos. The Maxanet Integrated Inventory & Photo loader will upload, resize, rename, and create thumbnail images automatically – but if you attempt to upload a large photo this process can take much longer than needed. In your camera settings, try to adjust the settings to 800×600, 1024×768, or a setting very close. Taking pictures in the 3MP or 5MP range will take a long time to upload!
If your pictures are already on your computer, you can download and install a free or paid program to optimize the images prior to upload.
Irfanview – website/download link. Free product.
Adobe Photoshop – website/download link. Free trial, monthly paid subscription.
Using the Integrated Inventory & Photo Loader
The Maxanet Integrated Inventory & Photo Loader tool is very powerful. This tool enables you to upload 5 photos at once. The system uploads your photos, resizes them to a web-friendly size, renames them to their corresponding item #, and creates matching thumbnail images.
Pop-Up Blockers
This system requires that your web browser POP-UP windows are ALLOWED. If your pictures are not loading, your browser is blocking pop-ups or you are using large images which take a long time to load. We highly suggest using Mozilla Firefox: 1) pop-up windows are enabled by default AND 2) you can drag and drop photos rather than having to click to browse and search for photos on your computer. This can be a huge time saver!
Clearing Cache
If you load a photo and the system displays an OLD photo, from a previous auction, this is often due to your web browser cache storing the previous image. Your photo is uploaded correctly, but you need to clear your browser cache. Click “ALL” to return to the summary screen and refresh your web browser to view the updated photos.
You can avoid this issue in the future by connecting to your Maxanet server via FTP, navigating to your workspace folder and deleting the old photos…or…you can use a rolling inventory lot # system in which you never have the same item #’s in your sales. For example…your first auction has lot #’s 1-100. Your next sale you start at 101-200. Your 3rd sale #201-300, etc, etc. This is great for inventory management down the road.
FTP Mass Image Upload
If you have a very large auction it may be best to consider using FTP to connect to your Maxanet server and upload your images in bulk. FYI: This advanced method is not for beginners.
There are a few steps you must complete for this to work:
- Your images must be resized and renamed to match your inventory file’s “Photos” and “Thumbnail” columns. See the Inventory Template download FAQ section above for examples.
- Also, you must create matching thumbnail images. This can be time consuming to do manually, but there are 3rd-party services available as well as programs such as Irfanview which can assist you.
Online Bidding Tools
Bidding Increments
You can change auction bidding increments two ways: 1) adjusting the default global site wide setting or 2) adjusting at the workspace-specific level.
Global Setting (default)
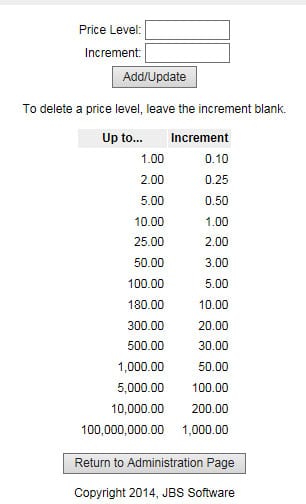
From the Main Menu: Online Bidding Tools: Bidding Increments. You must put an ‘up to’ and ‘increment’. Up to…$1 is a $0.10 increment for example. Increments do not take the $ sign or commas – just numbers (1000 for example). To delete a price level, leave the increment blank.
Workplace-Specific
You can also have workspace-specific increments. To the right of the “Bidding Increments” button is a paragraph of text containing a “click here” link. This option allows you to adjust the increments for this workspace only. (Remember, these settings will STAY for your next event in this workspace. To reset the workspace to use the global increments again, you must delete the workspace-specific increments.)
IMPORTANT: Make sure to have a very high increment at the bottom just in case (e.g. “Up to: $1,000,000” and “Increment: $1,000” see below)
“Up to…” means the increment will be in effect until the designated amount. For example, using the chart below, if a next required bid is for $40, the increment will be $3. This is because the bid is higher than $25, but lower than $50.
Restricting / Blocking Bidders
Due to various circumstances, you may need to block a bidder from bidding. The simplest way is to turn off the bidder’s bidding priviledges:
- Go to your bidder list
- Search for the bidder number
- Click the “Turn off bidding” button in the bidder profile.
When this is done, the bidder will no longer be able to bid. You can use the “Notes” section found near the top of the bidder profile to log notes regarding this bidder and why they were turned off. If you want to reactivate bidding for this user, simply click the button labled “Allow bidding.”
An additional feature in Maxanet is the ability to restrict IP addresses, which will prevent access from problem network locations. There are two methods to get a bidder’s IP address.
- Find the “New Bidder” email with their bidder number. This will display their IP address at the bottom.
- You can also identify a recent auction the bidder participated in and go to Online Bidding Tools: View Winning Bids. At the top of this, page click on ‘History’ and search for the bidder number. To the right will be their IP address.
Take this IP address and go to the Main Menu: Online Bidding Tools page. To the right of the ‘Bidder List'” button will be a paragraph of text. This paragraph contains a “Restrict IP Addresses” link. Click this link, enter the IP address, and click “Submit.”
Enhanced Invoicing
Configuring the Invoices
Main Menu: Online bidding tools: Enhanced invoices: “Save current prices as results” button in the middle of the page.
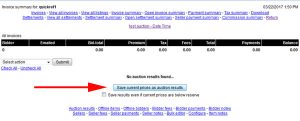
These saved prices will be the basis of what the invoices and settlements are generated from. Optionally, the results can be uploaded. The upload file must be a text file with either a tab or pipe (|) delimiter. The order of the data in the file is… item, price, and buyer
Results can be manually entered (modified and deleted too) using the ‘Auction results’ link from the bottom menu of the Invoice Summary page. If you are using quantities in your inventory make sure that you record the extended price.
If there are any auction results in place the option to save the current prices as results or upload results will not be available. Edit any item and select the ‘delete all’ option to start over.
Applying Tax Classes & Buyers Premium
In the screenshot below, the example is:
NY|State Sales Tax|.07|.15
Having this tax class will allow you to add a 15% buyers premium and a 7% sales tax rate to the invoices. You can add multiple tax classes, such as:
- NY|State Sales Tax|.07|.15
- NY2|State Sales Tax|.07|.13
- NY3|State Sales Tax||.15
- NY4|State Sales Tax||.13
As you can see from the above examples, each tax class has a unique identifier (NY, NY2, NY3, or NY4). In this example, NY3 would charge a 15% buyers premium and a 0% sales tax. These tax classes are global, so once you enter them in a workspace they will be available in all workspaces for all future auctions.

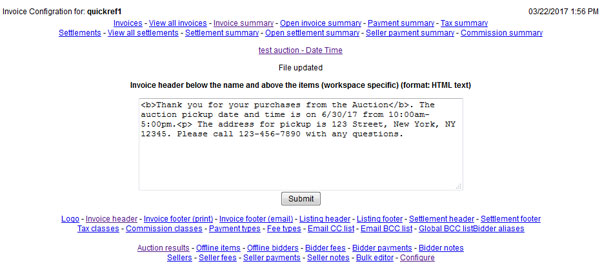
To add a paragraph of text to your invoices (e.g. “Thank you for your purchases. The pickup address is _____.”), click on “Configure” and then the “Invoice Header” link. Here you will enter your custom text (HTML accepted for text styling, hyperlinks, etc.)
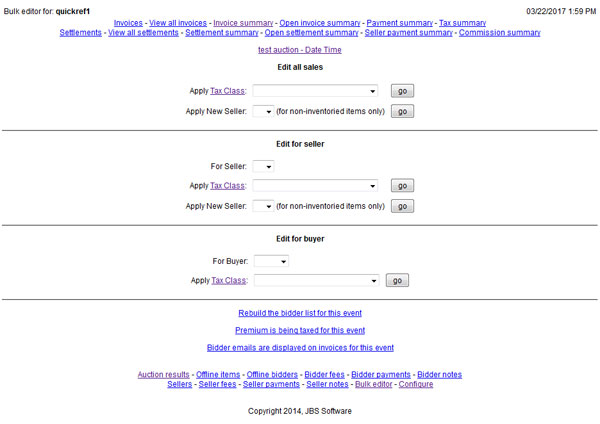
Applying Tax Classes & Premium to the invoices
After you create your Tax classes & Premiums from the Configuration menu, you can now apply these to your invoices.
From the bottom navigation menu, click on “Bulk Editor.” This page has three sections divided horizontally: 1) Edit all Sales, 2) Edit for Seller, 3) Edit for buyer.
Use the first section (Edit all Sales) to apply a Tax Class by clicking on the drop down menu and selecting the Tax Class you created previously. Then click the “Go” button to the right to apply the tax and premium to all of the invoices.
If you have a specific bidder who needs to be applied a different tax class or premium, use the 3rd section on the Bulk Editor, (Edit for buyer).
After you add your invoice header message and apply your tax class and premium to the invoices, it is good practice to check your work. Click on “View All Invoices” or “Invoice Summary” from the top menu to view your invoices and verify all information is correct.
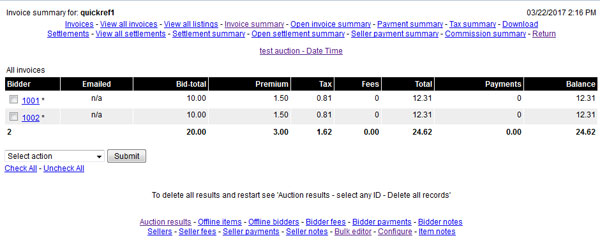
You are now ready to email your winning bidders their invoices (or optionally charge the credit cards on file with Authorize.net). On the Enhanced Invoicing page, in the lower left corner click the “Check All” link. This will put a checkmark next to all of the invoices above. Use the drop down menu to select “Email selected invoices” and press the “Submit” button. The system will send the invoices, and a time stamp will appear in the “Emailed” column of the Enhanced Invoicing page.
Commissions & Seller Settlements
On the Invoice Summary screen, in the bottom menu, click on “Configure.” Two options appear: 1) Commission Classes, 2) Sliding Commission Classes. There are examples above each box to show you the required format. Multiple classes can be added and used for future events in different workspaces.
To apply these commission classes, on the Invoice Summary screen, in the bottom menu, 1) click on “Bulk Editor” from the lower menu and 2) use the middle section to apply the Commission class for the specified Seller(s) 3) then hit “Go.”
You can now click on “Commission Summary” on the top menu to view. Select a Seller ID and you can now view your Settlement report which is ready to be printed or emailed to your Seller.
Advanced Options
From the Invoice Summary screen, you can add additional buyer fee’s, record payments, configure seller settlements, and more. This is very useful for record keeping. All of this info can be downloaded as a text file, saved, and imported into MS Excel or Quickbooks if needed.
Adding additional fees and recording payments
- From the Invoice Summary screen, click on a bidder number. This page will now display the invoice along with a left side menu.
- From this menu, click on “Buyer Fees.”
- Add the Type, Notes (optional), and amount. For example, “Type: shipping & handling charge”,”Amount: 50.00″. FYI: The amount section will not accept the “$” dollar sign.
- Click the “Add” button.
- Go back to the Invoice Summary screen and you will now see the updated balance for this seller has increased by $50.00.
- Click on the bidder number again to view the updated invoice, which will now show the shipping and handling fee of $50.
The same process above can be used to record payments. If a buyer pays by cash or check, click on the bidder number and then “Record Payment”. Add in the Type, Notes (optional), and the amount and then click “Add”. This will record a payment for this bidder.
If some items are taxable and others are not
Assuming the ‘taxable’ column in inventory is set to either ‘y’ or ‘n’ and that both the taxable and non-taxable items have a premium of 10%, the settings would be as below:
n|Non Taxable|0.00|.10
y|Taxable|0.065|.10
6.5|State Sales Tax|.065|.10
Using the bulk editor change the tax class of ‘y’ in the auction results to ‘6.5’. (Optionally–and more perhaps more effieciently–proper tax class can be uploaded with the inventory.)
Note: Avoid using a tax class of ‘y’ and changing the tax rate when conducting auctions in various locations. This setting is global and if it is changed it will alter invoices in this and other workspaces. There is no limit to the number of tax classes that can be recorded. Enter a tax class line for each unique tax rate.
If certain items have a different premium add another tax class. For example:
6.5np|State Sales Tax|.065|0
The above line has a 6.5% tax rate and a premium of 0.
There is no limit to the number of tax classes or commission classes that can be recorded.
Note: Be careful when modifying tax and commission classes. These settings are global and will change all invoices, settlements, and reports for all workspaces.
Email CC list
List the email address or addresses of who will receive a carbon copy (CC) of each invoice and settlement.
Email BCC list
Blind Carbon Copy (BCC) is similar to the CC list, but recipients will not see the email addresses of the other recipients.
Modifying results
Several options are available. Each data type associated with the invoices and settlement has a respective link at the bottom of each of the pages. The data listed and can be searched, edited, and/or deleted. Make sure you reprint or re-send emails for any invoices/settlements if the data has changed.
To make bulk changes to the data use the ‘Bulk edit’ link.
Optionally, inventory can be re-loaded with adjusted seller and taxable information. This can be done even after the auction has closed.
Once the auction results are in place editing the bid (vs. results) information will not have an impact on the results.
Items with reserves
If an item had a reserve, and the bidding did not meet the reserve, the results for that item needs to be deleted or adjusted.
Bidder notes and seller notes
Bidder notes and seller notes will not be printed on the invoices and settlements. Likewise, the notes will not appear on the emails.
Printing
The navigation links displayed on the screen will not print on the invoices or settlements. To hide information browsers print in the header and footer area, select File>Page Setup: Margins – Header/Footer, and remove the insert codes.
Paypal
If you have a Paypal account linked to your MaxaNet account, the invoices that are emailed will include a Paypal link.
If you have an Authorize.net account linked to your MaxaNet account you will have the option to charge the bidder credit cards individually or in batch.
Payment Processing with Authorize.net Payment Gateway
Payment processing goes from your Maxanet admin – to the Authorize.net Gateway – to your merchant Account – to your bank account.
If you already have an existing merchant account for payment processing, please ask your representative if their system is compatible with the Authorize.net Payment Gateway. If you do not have an existing merchant account, be sure to select one that is compatible with the Authorize.net Payment Gateway, or you can go through Authorize.net’s startup process by clicking here: Merchant Account Signup
Here, you can establish both a merchant account and the payment gateway. Then we’ll need your API key code and API login ID from your Authorize.net account to connect it to your Maxanet account.
We highly recommend using Authorize.net’s Payment Gateway with your Maxanet account. This gives you the option to charge the bidder credit cards individually or in batch. Additionally, you can pre-authorize bidders automatically upon registration before bidding for the first time. This will help verify the integrity of your auction so bid prices aren’t driven up by bidders not intending to pay.
Archiving an Auction
Saving/Downloading Auction Results
Once an auction is complete you can archive the auction, clear out the workspace, and put a new auction in its place. Clearing inventory and bid history is permanent, so it’s important to save all info needed prior to archiving an auction.
- Download and save all info needed from the workspace (e.g. invoices, summary report, seller report, bid history, etc.).
- When you download most reports they are displayed as plain text. Copy this info and paste it into a new Notepad document and save.
- You can then open this notepad document using MS Excel and import it as a “Text (tab-delimited)” file type. The delimited is the pipe | symbol which is normally located underneath a keyboard’s backspace key. You must set this pipe delimiter in order for the document to properly import into Excel.
Archiving and Auction
- Select the workspace from the top drop down menu and go to Main Menu>Calendar and Archives.
- Scroll down to the Auction Archives section.
- Add the Archive number in military format (yyyymmdd) – usually the end date of the sale. If you have multiple sales that ended on the same day that need to be archived, add an alpha character to the end of the archive number (e.g. 20170501c).
- Click on the “Archive this Auction” button.
- The next screen will tell you if the archive has been added or if there was a problem. If added, click on the archive number to further edit the archive.
- On the archive edit screen you can now edit the appearance of this archived auction as it will appear on the public facing archives page.
Saving Photos
-
- Connect to your Maxanet server via an FTP program. As an example, FileZilla® is a free ftp program you can download.
- Once connected, navigate to your workspace folder, and copy/download the images.
- You can now place these images into a different folder other than your workspace folder (e.g. /html/archives/050317)
- Within your Maxanet administrative panel, edit the BaseURL of the archived auction to match this folder directory where you have moved the photos to.
Note: Maxanet is not a storage company and we charge clients who exceed storage limits on their account. A great alternative is to download your photos from the Maxanet server and re-upload them to a 3rd party hosting account or cloud based service…and then adjust the archived auction’s BaseURL accordingly.
If you are using a rolling inventory lot # system in which you never re-use the same lot#’s across any of your auctions, then you can use the BaseURL from the Main Menu: Auction Details field. A rolling inventory lot # works like this…your very first auction usesz lot #’s 1-100. Your second auction starts at #101-200. Your third auction starts at #201 (etc., etc.). You never have duplicate item #’s and if your images are saved as corresponding lot #s (e.g. 1.JPG, 2.JPG), they will never duplicate. This allows you to use the workspace’s default BaseURL.
Clearing Out the Workspace
Once you have archived the auction and verified the archive is displaying correctly, you can delete the inventory, bids, and invoices from the workspace so the next auction can go in its place. This is PERMANENT. Please save all information, reports, etc before clearing out the workspace.
Select Main Menu>Inventory and Photos>Edit Inventory>Delete All (“yes” to confirm).
Select Main Menu>Online Bidding Tools>Delete All Bids (“yes” to confirm).
You can also delete all the old invoices, if desired, by going to Main Menu>Online Bidding Tools>Enhanced Invoicing>Auction Results (bottom navigation menu) select any of the IDs, then delete all records.
Bulk Mailer & Contact Manager
Bulk Mailer
Maxanet has a built-in bulk mailer and contact utility that allows you to 1) collect email addresses and interests from your website visitors, then 2) mass email them through your Maxanet admin panel.
Bulk Mailer
Click on the “View Email Cart” button and you can add emails, send emails, delete emails, or empty the cart.
When adding emails to the cart they need to be 1 email per line.
This utility is very handy for sending reminders to bidders who are participating in an auction.
- Select your workspace
- Go to Online Bidding Tools>Bidder Reports>All Active Bidders>View.
- At the bottom of this screen there is an “Add Emails to Cart” button.
This is a very quick and easy way to alert participating bidders of an update to the auction, or to remind them that the auction is closing/ending soon.
The Bulk mailer has a built in saftely function where you cannot send more emails than you have registered bidders…this is to reduce spam. The limit is 1,000 email addresses (if you have <1,000 registered bidders.)
Contact Manager
The Contact List is a great way to add a web form to your website that will allow your website visitors to enter their email addresses. You can use the contact manager to sort and add emails to the bulk mailer. Instructions can be found in the paragraph above the “View Email List” button.
If you need help adding the contact manager sign up form to your website please let us know.
Downloading into MS Excel
Bidder List
You can download your bidder list and save it in MS Excel by using the following steps. Please make sure to view the step-by-step video turtorial further down this page.
- From the Main Menu, select Online Bidding Tools> Bidder List.
- Click the blue colored “download” link near the top of the page. Your bidder list will now display as a plain text format in your web browser.
- Right click anywhere in this page and hit ‘select all’.
- Right click again and select ‘copy’.
- On your desktop, or in a folder on your computer, create a new blank text document.
- Open this text document, right click with your mouse, and select ‘paste’. This will paste your bidder list into this text file.
- Save this text file.
- Open up MS Excel.
- Use the import options to change the ‘file type’ to ‘all files’ and not just MS Excel files to open.
- Find your newly created text file and open it.
- Using the Import Wizard, select ‘delimited’ and then on the next screen click on ‘other’ and put the tab delimiter “|” (shift + \ on your keyboard).
- Finish the import and your data should now be formatted correctly and you can save as an MS Excel file now.
Inventory Descriptions
Your inventory descriptions and image links can be downloaded into MS Excel, edited, saved, and re-uploaded. This works great if you need to add an additional item into the middle of your auction.
If you use the Maxanet Integrated Inventory & Photo Loader, any new items added–no matter what item # you give it–will go to the end of the auction catalogue. Important: You can ONLY download, edit, and re-upload inventory descriptions using the Option #1 upload in the Maxanet Inventory page. You cannot download and reupload inventory previously saved using Option #2 or Option #3 – you will lose your advanced formatting.
See the above section labeled ‘Bidder List’ for instructions on how to download, or scroll to the bottom of this page and view the video turtorial called ‘Downloading Bidder List or Inventory into MS Excel’ for step by step video instructions.
Website Customizations
Customizing Your Website
Maxanet provides a ready-to-go website, but some clients may prefer to hire an outside designer to build their own custom layout design, add additional features, or display options.
You can display your event calendar on an .shtml page using a server side include, or you can use an externally-hosted CMS (example: WordPress) to control your own content and “step in” to your Maxanet events with links. Note: For security reasons, Maxanet does not allow database access, so you cannot install WordPress onto your Maxanet server.
Page Settings
Customization options are available from Main Menu>Page Settings. We do not recommend making changes to this section unless you are familiar with coding or you hire an experienced website designer.
The Page Header and the Page Footer text boxes are for the HTML code of your website. The Maxanet auction page content is automatically inserted in between this Header & Footer code with the META head tags being uploaded via a text file at the bottom of this page.
You can update your Calendar format (0-13) which will display your event calendar in different ways.
The “Redefine Link Text” section will alter the link display and is HTML-friendly.
Adding Buttons and HTML Elements
You can enhance the display of your auctions by adding HTML elements within your Maxanet administrative panel.
For example, choose your workspace and select Main Menu>Auction Messages. Depending on your Calendar Format (Main Menu>Page Settings), some boxes such as “Auction Highlights” will display on your main Calendar (home page). You can add HTML hyperlinked buttons such as an “Enter Auction” button your website visitors can click to enter your auction directly.
FAQ & Troubleshooting
Maxanet Account Issues
Please call us at 814-558-2306 or send us a message through our Contact page.
Upgrading Your Maxanet Account
Maxanet clients have many options for upgrading their account:
- Adding additional workspaces
- Maxanet hosting account
- Responsive Layout Upgrade
- SSL certificate to secure their website
- Adding an @yourdomain.com email address
- Dedicated server upgrade
Please call us at 814-558-2306 or send us a message through our Contact page.
Adding Additional Workspaces
All new Maxanet clients start with 2 workspaces. You can upgrade your workspaces at any time by emailing us through our Contact page.
Making Your Website Secure with an SSL Certificate
Recent updates to the Google Chrome and Mozilla Firefox web browsers have marked unsecure websites with a warning in the URL address bar. If you want your Maxanet website to be secure, we’ll need to order and install an SSL certificate for your site & server.
The cost is $200/year and Maxanet will handle the configuration and installation. Please contact us for more details. If you have your own SSL already we can attempt to add it to your Maxanet server for a fee.
How Do I Pay My Maxanet Bill?
Inside your Maxanet administrative panel, there is an “Account Balance” link near the upper-right corner of the Main Menu. This links to a page displaying a detailed breakdown of your account billing along with recent payments. At the bottom of this page is a “Pay with Paypal” link, or the address for mailing checks.
My Inventory Pictures Are Not Loading Correctly
First, make sure you are using the Mozilla Firefox web browser to load your inventory photos using the Integrated Inventory and Photo Loader.
This tool requires that POP-UPS are ALLOWED.
If you are manually uploading your photos, please verify that the BaseURL is correct (Main Menu>Auction Details).
Old Pictures Are Displaying in the Auction
When you visit a website, your web browser “remembers” images so when you visit the same page in the future it can load the page and resources/images faster. This is called “caching.”
If you use the SAME ITEM NUMBERS from one auction in a workspace to the next auction (e.g. item 1, 2, 3), your web browser may display the old pictures because they have the same image names (e.g. 1.JPG, 2.JPG, 3.JPG).
If you are seeing old images from the previous auction, refresh your web browser page. If you are in the Integrated Inventory and Photo Loader, click on ‘All’ at the top, and then refresh this page to avoid duplicated item photos.
A great way to avoid this issue is to use a rolling inventory lot # system. Your first auction starts with items #1-100. Your next auction continues where the first auction left off (#101-200). And then your third auction starts with lot #201-300 (etc., etc.). This way you never have duplicate item #s.
Making the Auction Go "LIVE"
Once you are ready to make your auction go “live” so it is viewable on your website, you must add the workspace to the Calendar.
- Select Main Menu>Calendar & Archives.
- Enter the workspace into the first box and click update to save.
- This will now add this workspace to your Calendar/homepage.
If you do not see the “View Items and Bid” link to enter the auction, you must do the following:
- Go into the Integrated Inventory and Photo Loader, or the Edit Inventory page.
- Scroll to the very bottom and click the ‘Update Categories’ button.
- This will generate the ‘View Items and Bid’ link and allow your bidders to enter the auction.
Video Tutorials with Audio Instructions
Getting Started Video Tutorial
Integrated Inventory & Photo Loader Tutorial
IrfanView Image Resizing/Optimization Tutorial
Enhanced Invoicing & Seller Settlements
Downloading Bidder List or Inventory into Excel
Questions? Send us a message through our Contact Us page.
Ready for your full-featured online auction software?

Follow Us